That’s right! K.Y.S.S. (Keep Your System Simple) and commit to using it to its full potential.
There’s no wrong way or right way to keep a planner system. There’s only what works for you and what doesn’t.
With so many different planning tools, systems, and accessories, it can be overwhelming and you will wind up spending more money and time looking for the “perfect” system. While some experimentation is fun, too much can distract you from the purpose for which you started using a paper planner in the first place. If you were already a paper planner user, then you may have made complicated a system that was already working for you and are now in “planner fail”.
You can spend hours upon hours changing up your system, more money, more stuff – and still be dissatisfied.
I have always relied on paper tools to keep my schedule and task lists. I have used all kinds of planners – ring bound, spiral, bound books, with various formats – daily pages, WO2P formats, monthly pages only and a combination of them. Despite the book or format I used, my system was always fairly simple and worked for my needs.
I’d record my schedule, appointments, tasks, reminders, track billable time and important events or things of note. That system worked just fine for me at the various stages of my life.
After experimenting with my set-up over the last several months, I would have to say that my system has evolved, although the fundamentals of how I work are pretty consistent.
I use my personal Aston Filofax as my planner to hold my monthly and weekly pages. I use a separate notebook to write out my to-dos, project planning, and random journaling. Currently, I am using an Ecosystem Architect Notebook (with grid/graph paper). I love this system! It allows me to maintain my current system – what I’m used to – but also give me room to expand and write as much as I like or need to without the bulk or weight of an A5 or desk size binder.
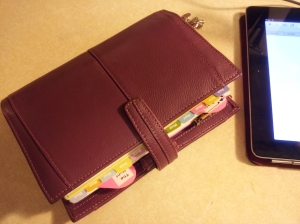
This is my personal size orchid Aston Filofax.
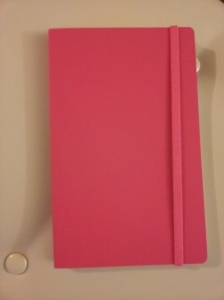
Ecosystem Architect Notebook
If a system complicates your life, it’s not working! Step back, evaluate your needs, take inventory of what you have, determine if there is something you really need to make your system effective (not just cute) and, wait for it…COMMIT!!!
The key to this thing is to find or create a system that works and stick with it. Your productivity will increase once you shift your focus on using the planner system you have. It’s okay to tweak your system along the way as your life or needs change. However, complete overhauls can have the opposite effect. For instance, I am looking for new business opportunities so I created a section devoted to that project and added it seamlessly into my planner. No overhauls required!
The whole idea for me is to be more productive, record as necessary, and plan.
There is no such thing as a perfect system. There is however a system that works perfectly for you. I love sharing ideas but I try not to overwhelm myself by incorporating too many ideas into my books.
Whatever your goals, don’t allow an overly complicated system or set-up distract you from its intended purpose. Remember to K.Y.S.S. and commit. 😉


